Our family owns a spices and local products shop, which was forced to shut down during the COVID-19 pandemic, as all the public activities came to a halt. This forced us to think of new ways of selling products, without us shipping our products to other places previously. I, being a Computer Science student, decided to solve this by creating an e-commerce website, showcasing all of our products. In this post, we shall look into how I built the website in the first version, its functioning, and, the building of its second version which is currently up now.
The Beginnings
In the beginning, I decided to go with a no-code SaaS platform, as I was busy working on my Master’s research project AndMal-Detect. There are a lot of platforms to choose from, such as Shopify, GoDaddy and JustDial. I was focusing on the cost initially since I was unsure how the business would go online. Attracted by Wix’s cheap plan, which included a free domain for a year, I went ahead with it.
The setup was pretty simple, I photographed all our products with Nikon D7200 DSLR I had, and wrote the description for some of them. The Wix UI provided a nice option to create these products, although the work was repetitive. Then, using the template builder, I created a home page, which itself showcased all the products. Within a matter of weeks, the website was up and running!
Life with No-Code
We got started on e-commerce very well. Initially, I created social accounts with the website and kept them very active. Soon, my interest in social media got drying up, and soon I ended deleting up every social media account except Instagram. Thanks to the nice SEO capabilities provided by Wix, we still kept getting orders.
On average, we got around 5-6 orders a month. While the numbers seem pretty low, we got an incredible community of customers, who are always supportive and keen to give feedback on the website and the business, in general. With this feedback, we were able to figure out some pain points of them.
The Pain Points — Customers’ and Owner’s
- Slow — The website was tooooo slow! We often heard complaints that several parts of the website were not loading even on a fairly good internet connection. We ended up getting orders on WhatsApp in such cases.
- Glitchy — Sometimes, clicking on buttons would not work. Worst of all, when coupled with the website being slow, there was no state to indicate transitions between the pages, leaving users in a state of confusion.
- Unnecessary Features — At checkout, by default, the option to enter promo codes shows up. While our customers are very familiar with them, we could not afford to roll out promo codes and discount offers. This led to churn in some cases as well!
- Less flexible Shipping Options — We calculate our shipping charges by weight. While Wix allows this method, the weight slabs are limited in number, mostly up to 7 or 8. When the cart weight exceeds the slab, the shipping price is capped at the maximum, although it could be higher in the real world. It was hard to convince our customers about the change in the shipping charge.
- Less Room for Customizability — As a website owner, I wanted to enjoy the full ownership of the website, customizing it to the lowest details. Unfortunately, I was limited to the features that Wix offered.
- The Cost! — While the initial cost of Wix was attractive and affordable, it grew over the years. For example, the cost of the 3rd year (which was supposed to be this year) is 10x of 1st year!
Choices of the Migration
While I was experiencing these issues for a quite long time, I sprung into action after I was confident in website development using React by building a website for myself using Gatsby. The video about Mantine UI by Fireship further encouraged me to take the project up and complete it within some weeks. I found several alternative approaches:
- Use NextJS Commerce Starter and a headless E-Commerce CMS
- Go with Shopify or Wix ADI which seem to be fast and promise good core web vitals scores
- Build something on my own!
NextJS Commerce Starter
The NextJS Commerce Starter template can seamlessly blend with several headless CMSes tailored for e-commerce. Their demo with the BigCommerce backend seemed pretty fast and I liked the performance of the website. When it came to the choice of the CMS, BigCommerce seemed quite costly. The story was the same with other CMSes like Swell. However, Saleor, an open-source CMS seemed to be quite promising.
Saleor is fully feature-packed and extendible through plugins. It offers both self-hosted and cloud options, and the cost of the cloud exceeded that of Wix. I was looking for some cheap cloud VM and found Oracle cloud providing a good ARM machine in the free tier. Unfortunately, it did not accept any credit cards to sign up for the trial!
Another SaaS No-Code/Low-Code solution
Choosing another SaaS No-code solution could solve some of the pain points, but in any case, it would not be fully customizable. Thus, I decided not to go with this option and move ahead with investing some time into developing the website from the scratch.
The Migration to Code
I was pretty confident with React+TypeScript by working on enterprise projects at that time. Randomly, I came across Hygraph E-Commerce Starter while browsing through my GitHub feed (thanks GitHub!). Although I had built my blog with Hygraph, I never thought of sourcing an e-commerce website using Hygraph, as I always imagined a fully-functional backend server listening to new orders. The starter template gave me a good start.
Tech Stack
I decided on the following stack for the website.
- Hygraph for the content layer. Hygraph has excellent data modeling capabilities like two-way typed relationships and provides a GraphQL API to consume the data.
- NextJS as the React framework. The Static Site Generation is particularly useful to pull in the data from Hygraph during the build. The API routes can be used for order placement.
- Mantine UI as the CSS framework. Mantine UI is nice-looking, modern, and sleek; although I plan to introduce a design system and write a custom component library.
- MongoDB for storing order and customer data. Hygraph could have been used for this; more on that later!
In the upcoming sections, I will pick up some interesting and challenging parts of the migration process and discuss them in some detail.
Bootstrapping the Project
Although Hygraph e-commerce starter provided a nice frontend with NextJS+TailwindCSS, I decided to start barefoot using the official NextJS starter. On the Hygraph side, I cloned their template and sample data into a new project.
After setting up prettier and path aliases in tsconfig.json, to avoid the long train of ../.. in the imports, I made the first push and set up CI/CD using Vercel. For every commit pushed and the PR created, Vercel would provide me with a deployment, which I can test and share with friends for feedback.
Assembling the UI pieces
I didn’t go with a design-first approach, as I’m not an expert designer myself. I had the following idea of the website layout in my mind:
- The website would contain a homepage, product page, and category page along with the checkout page
- The homepage would consist of a hero, along with the product grid
- Product page will display the product image, description, and a CTA to add the item to the cart
- Category page would show a product grid consisting of the products in that category
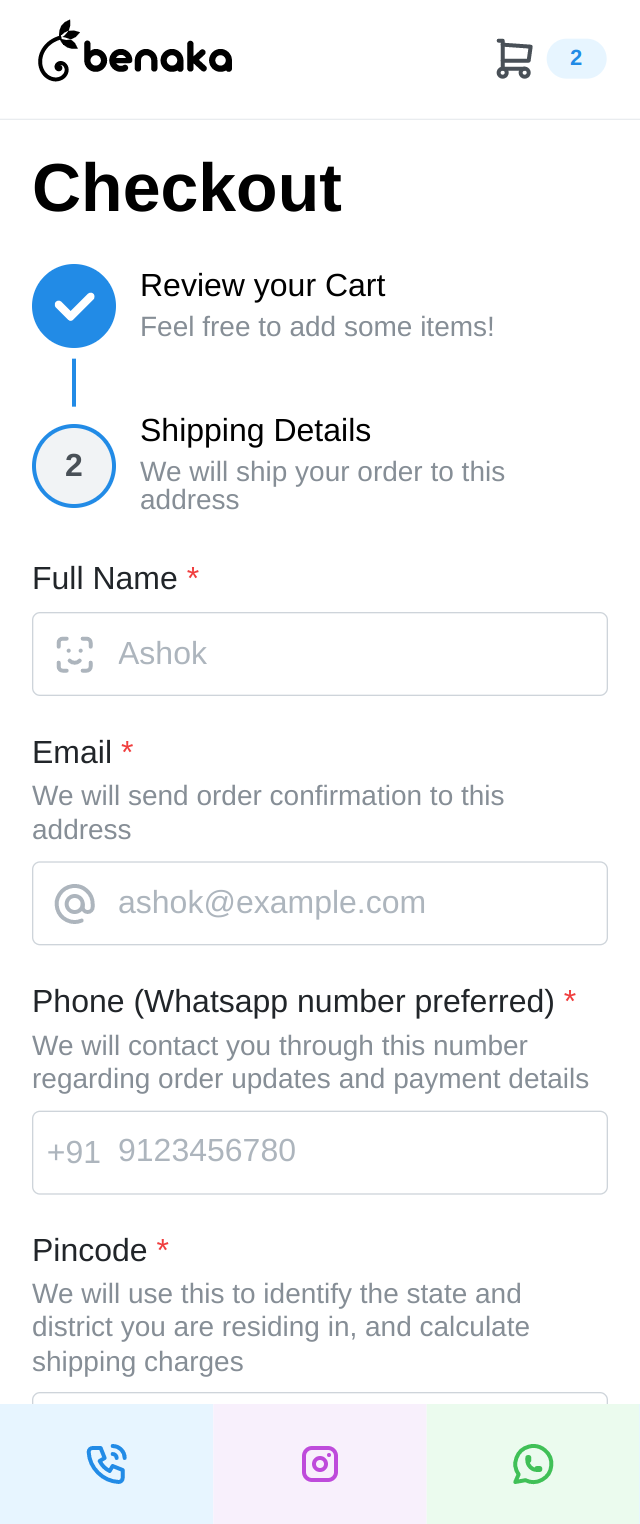
- Shipping page would take the user through a flow, asking for address details and order confirmation
While looking for UI components to achieve this, I came across Mantine UI, a collection of UI components built using Mantine. I copy-pasted some of them into my codebase and tweaked them according to the needs. It was only after I finished implementing the functionalities, I relooked at the code and optimized it.
The GraphQL Interface
The core part of the website is to fetch products from Hygraph and populate the static pages. Since Hygraph provides a GraphQL interface, I needed to use a GraphQL client. I went with graphql-request, as it was minimal.
The fun part is to type the GraphQL responses to get meaningful suggestions in TypeScript. First, I created schema definitions in the schema/ folder for every Hygraph schema. An example schema looks like this:
// schema/product.ts
import { Variant } from "./varient"
import { Category } from "./category"

export type Product = {
  name: string
  slug: string
  description: string
  variants: Variant[]
  categories: Category[]
}
I relied on querying multiple items from Hygraph, even though it supports querying a single item based on a condition. Since I knew what I would be querying, I created a type to represent the GraphQL response.
// schema/response.ts
export type Keys =
  | "products"
  | "productVariants"
  | "collections"
// More here in the OR

export type Response<T, key extends Keys> = {
  [keyName in Keys & key]: T
}
The type Response<T, key> is the crucial part here. It can accept only the strings defined in type Keys for its second parameter. For example, the type Response<T, "products"> resolves to {product: T}. I had to spend half a day figuring out the intersection [keyName in Keys & key]!
Then, everything was straightforward. I wrapped the request method of GraphQLClient with my method, passing in the authentication tokens, and directly returning the Response type.
// helpers/graphql.ts
import type { RequestDocument } from "graphql-request"
import type { Keys, Response } from "@schema"
import { GraphQLClient } from "graphql-request"

const client = new GraphQLClient(process.env.GRAPHCMS_ENDPOINT!)

export const request = async <T, K extends Keys>(args: {
  query: RequestDocument
  variables?: { [key: string]: string | number | boolean }
  isMutation?: boolean
}): Promise<Response<T, K>> => {
  const { query, variables = {}, isMutation = false } = args
  return client.request<Response<T, K>>(query, variables, {
    authorization: `Bearer ${
      isMutation
        ? process.env.GRAPHCMS_MUTATION_TOKEN!
        : process.env.GRAPHCMS_READ_TOKEN!
    }`,
  })
}
With the wrapper method in place, querying in getStaticProps was as easy as
const { products } = await request<
    Pick<Product, "name" | "variants" | "slug">[],
    "products"
  >({
    query: graphql`
      {
        products {
          slug
          name
          variants {
            id
            title
            price
            weight
            product {
              name
            }
            images {
              url
            }
            isPrimary
          }
        }
      }
    `,
  })
While I sometimes used Pick<T, keys> to mention the keys being chosen in the GraphQL query explicitly, I was lazy enough to just use T in some other cases 😅! I am still looking for a way to better type GraphQL in TypeScript, please let me know if you know of other ways!
Fixing the Initial Load Glitch
After some days into the development, when the website was feature-ready, I started to observe an initial glitch during the website’s loading. The glitch was prominent on slow internet connections, and it appeared as if the website was rendered without initial CSS. You can check this yourself at this preview link.
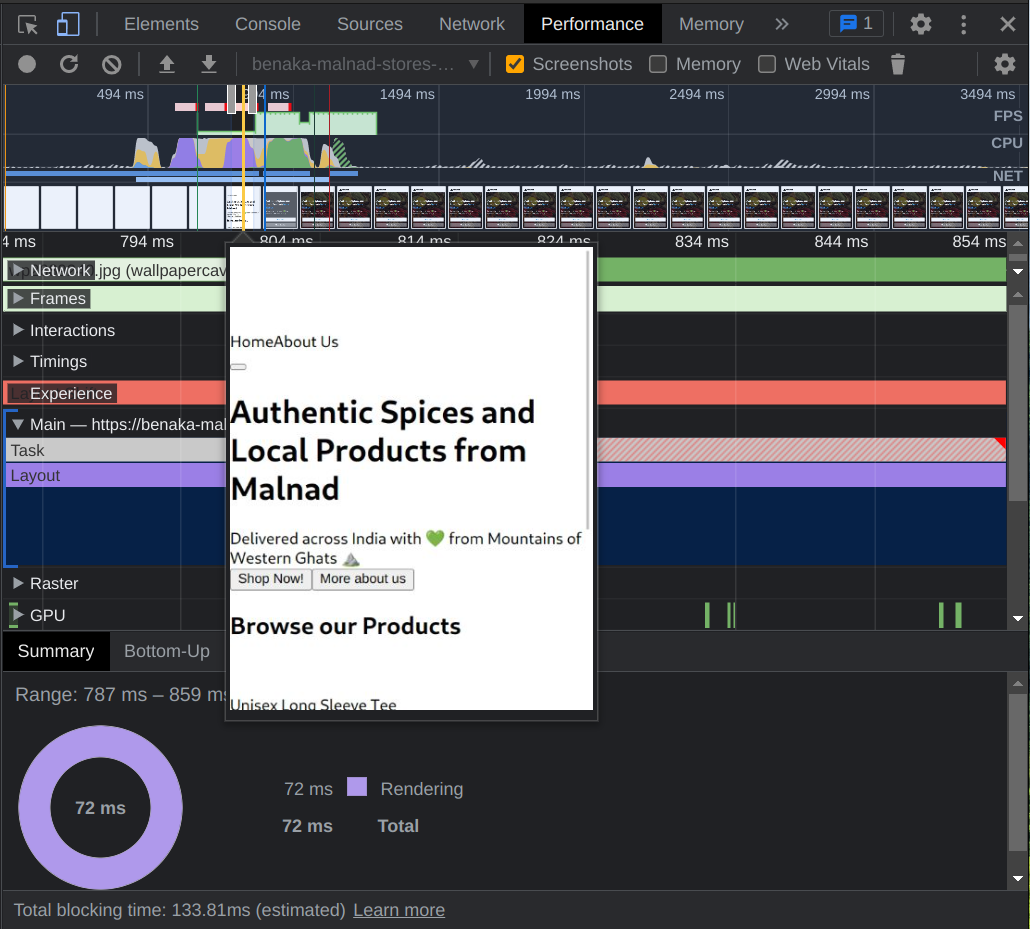
This was a big headache, and after trying every possible way to fix this problem, I was in no luck. I even felt that going with UI frameworks was a bad idea. When I experimented with other websites built with Mantine, this was not the case. I was checking the Mantine versions in package.json and thought I could do npm update to check this. Fortunately, it solved the issue 🎉 by upgrading @mantine/core from v4.0.9 to v4.1.0.
Stepper with Sandwiched Content
The checkout page required a stepper to take the user through the flow. While Mantine provides Stepper component, it does not allow content to be in-between the steps when orientation="vertical". Either, I could use a sidebar-content layout with the stepper in the sidebar (which was not obvious on smaller screens), or, override the stepper myself. Inspired by the MUI Stepper, I chose to override the stepper myself, and it was easy. I plan to start a PR in Mantine with this improvement. Following is the result of the override.
The Backend
Vercel functions can nicely facilitate the needs of an API. In the Hygraph e-commerce starter template, the schema contained Order and OrderItem, and it was integrated with an external payment gateway. In our case, we did not want a payment gateway, as we collect payment by contacting the customers manually. Apart from that, I needed to get a notification whenever an order is placed. While Hygraph webhooks can be used for this, I noticed a few difficulties:
- Hygraph mutation to create order was slow, and Vercel Functions were timing out. Later I fixed this by providing separate APIs for mutating
CustomerandOrder; however, there were still occasional timeouts - In the notification, I wanted customer details and order details. Since the webhook only provided the IDs of the nested fields, I still needed to fetch them separately.
Thus, I decided to go with MongoDB, which provides 25GB of storage in their free trial. Instead of calling Hygraph mutations, the APIs now directly wrote to MongoDB. Automagically, this also reduced the timeouts. On the MongoDB side, I used triggers to send an email to the customer once an order is placed, keeping me in bcc. Thus, both problems were solved with a single solution.
Apart from writing to the database, the backend API also handles calculating shipping charges. Finally, I was free from the limitations and was able to write a very simple code to calculate shipping charges.
import { NextApiRequest, NextApiResponse } from "next"
import type { ShippingProvider } from "@schema"

type RequestData = {
  pincode: string
}

type ResponseData = {
  shippingProviders: ShippingProvider[]
}

function getShippingProviders(pincode: string): ShippingProvider[] {
  console.log(
    JSON.stringify({
      path: `/shippingProvider`,
      pincode,
    })
  )
  const isBangaloreRegion = pincode.startsWith("5600")
  const isKarnatakaRegion = ["56", "57", "58", "59"].some(digit =>
    pincode.startsWith(digit)
  )
  const shippingProviders: ShippingProvider[] = [
    {
      name: "Indiapost Parcel",
      key: "INDIA_POST",
      ratePerKg: 45,
    },
  ]
  if (isBangaloreRegion) {
    shippingProviders.push({
      name: "DTDC Courier",
      key: "DTDC",
      ratePerKg: 40,
    })
  } else if (isKarnatakaRegion) {
    shippingProviders.push({
      name: "DTDC Courier",
      key: "DTDC",
      ratePerKg: 60,
    })
  }
  return shippingProviders
}

export default function handler(
  req: NextApiRequest,
  res: NextApiResponse<ResponseData>
) {
  const { pincode }: RequestData = JSON.parse(req.body)
  const shippingProviders = getShippingProviders(pincode)
  res.status(200).json({ shippingProviders })
}
Data Migration
Once the website was functional, it was time to migrate the data from Wix to Hygraph. Fortunately, Wix allowed me to export the products as a CSV file, which I downloaded and cleaned in Google Sheets. Then, I converted it into a JSON file. Since I wanted the product images to be exactly 800x800 dimension, I used sharp to resize images, and node-fetch to upload them into Hygraph media endpoint. Once I got the uploaded image IDs, I created the objects in Hygraph using GraphQL mutations. The data migration took about 2-3 hours, as I was fixing the bugs, and manually writing the retry logic!
Redirects and SEO
Once the data was migrated, the website was production-ready. I added the meta tags using next-seo. Since the paths of the pages were substantially changed, I had to configure 308 Permanent Redirect for all such pages, to make new pages appear in Google. I had to manually write the redirect map in next.config.js 🥲.
The Deployment 🚀
One day, when I was still developing the website, I got a Whatsapp message from a customer that the website is not working. I immediately contacted them and got to know that the website had become too much glitchy that they were unable to place orders. The time to deploy the website to production has come!
With the redirects ready, I proceeded to detach the domain from the Wix website and deleted it entirely (I deleted it fearing the duplicate content would affect SEO, I never took a screenshot to compare the website with the new one 😢!). Then, in the Vercel dashboard, I assigned the domain benakastores.com to the website, and, it was up and running!
The next day, we got an order from the new website, which was amazing. I submitted the new sitemap to Google, and the new paths were visible after some two weeks. Now, the website loads much faster, shipping logic is much simpler, no unnecessary components and it is fully customizable 🎉. It solved all the old problems, with scope for improvements on the horizon.
Scope for Improvements
There is a lot to improve now, both from the business side and the website side. Some of them are:
- Currently, we observe that the customers enter the website through Google, shop for one particular item, and check out. Although I have added recommendations at checkout, customers are not bothering to go through them.
- We can create a brand by custom-designing the website components and making the experience unique. It is planned for the v3 of the website, though!
- When we want to update a product, currently, we have to rebuild the entire website. I’m now looking into NextJS’ Incremental Static Regenration to handle such situations.
- If you find something, please feel free to reach out to me!
Thanks
- Our customers for the feedback!
- @sourabhdaroji for design suggestions
- @chaithalibt, @vinyasns, and, @ikshudhanva for testing the website from an early stage